Article
8 comments

Baking in Translation: NZ Ingredients for US Recipes

Two weeks ago, I started a riot on my personal Facebook page with this photo:

Boston_cream_pies
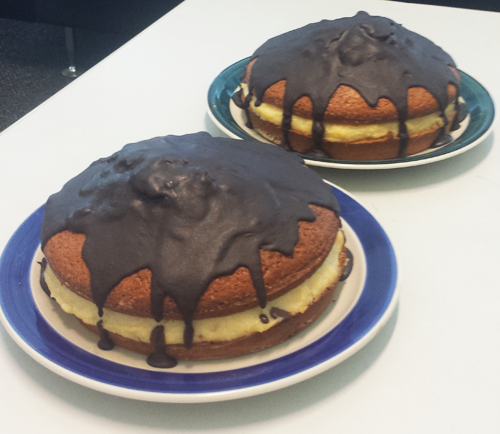
That’s two homemade Boston cream pies. Vanilla cakes filled with vanilla-bean pastry cream and topped with a dark chocolate glaze. They look delicious, but there was a problem: when I used the US recipe for the cakes with New Zealand ingredients, the cakes didn’t come out light and fluffy, as they are supposed to be. Instead, they were almost as heavy as pound cake, squeezing out the vanilla-bean custard when the cake was sliced and served. This varied outcome is a good example of what can happen when you try to bake US recipes with New Zealand ingredients.

So, this post is here to help you adjust US baking recipes for the NZ kitchen. And it focuses on baking from scratch. This isn’t just a baking challenge for Yankee expatriates in New Zealand. If you are entranced by images on a popular culinary blog overseas, you might try to recreate the recipe…and run into some problems, or find that the result doesn’t have exactly the taste or texture you expected. This post is here to help.

As I learned when I tried to find a Boston cream pie recipe, many US baking recipes now rely to an alarming degree upon mixes and packaged items. If you want that artificial baking-mix flavor, it’s waiting for you in the baking aisle of a large NZ grocery store. But that’s not going to help you make challah bread, St. Louis butter cake, flaky pie crust, or…the list goes on.[Read more]

Article
0 comment

Salted Caramel Ice Cream

Salted. Caramel. Ice cream. Is there anything more decadent? Sugar caramelized to a dark mahogany gets blended with milk, cream, and eggs, and just the right amount of sea salt and vanilla. Try this over the holidays – not for Christmas, no – but over the long days afterwards.

Let it cool and then chill overnight

Salted caramel ice cream base, flanked by vanilla and salt

This is the recipe I use, though I admit I leave out the praline, and with NZ dairy, I use 2 cups of cream to 1 cup of milk for a firmer texture. Avoid oversalting it -  too much salt keeps it from freezing. I recommend chilling the mix overnight in the refrigerator, in a glass or metal bowl. Glass or metal gets the mix even colder. Then, make your ice cream first thing in the morning. This is particularly important in the summer, before your kitchen warms up from the heat of the day, or from other cooking. It’s also helpful when you are wrangling more-reluctant-to-freeze flavors at home: these are ones that include chocolate, liqueur, or, you guessed it, salt and caramel.

Let it chill in the maker, bro

Whirrrrrrrrrrrr

Once it’s as frozen as your ice cream maker can get it, you’ll need to freeze it for 3 to 8 hours to firm up even more.

You can recycle another ice cream container

Decanted and ready to freeze

Even after freezing, it can still be soft, for an ice cream.

Real ice cream melts when you photograph it.

Scoopable right out of the freezer.

I like to serve this as one or two small scoops, with a scattering of toasted chopped almonds, and a dollop of whipped cream – a layered and understated ice-cream sundae. Any chocolate sauce is overkill, and salted caramel ice cream is often too soft to survive the affogato treatment, but some cacao nibs would work.

You're so beautiful, in every single way

With a dollop of whipped NZ cream, perfection.

One time, I made a double batch of this base and some mad scientists froze it with nitrogen. Incredible, and a crowd-pleaser for a sophisticated crowd.

Article
0 comment

Tiramisu, To Scale

This tiramisu image by Shok is pretty much what mine looks like. Image reused under Creative Commons with thanksA friend of mine had her New Zealand citizenship party the other night. I plonked a tiramisu on the dessert table between the New Zealand flag sponge cake and the pavlova. It was the perfect creamy transition between the two. I’ve been asked for the recipe, so here it is!

Sometimes I want to make tiramisu for a small, intimate dinner party. And sometimes I want a bathtub-sized tiramisu to take along to a 50-person bring-a-plate. I get tired of scouting around for the right sized tiramisu recipe, so here is one recipe to fulfill all your tiramisu needs.

Creamy and oozy, utterly natural, if you want this to behave when served, prepare it in individual serving ramekins/cups/bowls. If you want a tiramisu cake, which is guaranteed to “plate up” neatly, here’s a grand recipe anointed by many a food blogger.

The Small one is for 2 to 6 servings, and it can be split between cups or ramekins for that number – it’s a bit richer than the two larger versions. The Medium is a good one for a larger party, 6 to 10 servings. And the Giant, perfect for a 9″ x 13″ tray, is for when you want to feed the world 18+ servings.

Ingredients Small / In Individual Cups / 2 to 6 Servings
Medium / Loaf Pan / 6 to 10 Servings Giant / 9″ x 13″ Tray / 18+ Servings
Mascarpone 200 gm 500 gm 1000 gm
Ladyfingers/savoiardi biscuits Half a regular packet One regular packet Two regular packets, one food service packet
Eggs 1 yolk 2 yolks 4 yolks
Confectioners sugar 2 tablespoons 3 tablespoons 6 tablespoons
Vanilla extract or paste ½  teaspoon 1 teaspoon 2 teaspoons
Rum 1 tablespoon 2 tablespoons 4 tablespoons
Espresso 2 tablespoons 3 tablespoons 6 – 7 tablespoons
Cocoa powder 1 tablespoon 2 – 4 tablespoons 4 – 5 tablespoons
Whipped cream 75 ml cream, whipped with 1 tablespoon confectioner’s sugar 150 ml cream, whipped with 2 tablespoons confectioner’s sugar 300 ml cream, whipped with 4 tablespoons confectioner’s sugar
  1. Tiramisu by FrancescaV, reused under Creative Commons, see link below.Whisk the egg yolks with the sugar until pale and frothy. Use an electric mixer/beater for best results.
  2. Add 2/3 of the rum, the confectioner’s sugar, the vanilla, and the mascarpone. Whisk until blended.
  3. Assemble the base layer of the tiramisu using the lady fingers. Put the coffee and the rest of the rum into a flat bowl. Dip a ladyfinger in the coffee/rum briefly on each side, then place it in the base of your dish. If using a ramekin/teacup/etc., break ladyfingers to size, then dip and place. Repeat until the base is covered in one layer.
  4. Pour enough mascarpone mix over the ladyfinger layer to cover. Sprinkle cocoa powder generously over the layer.
  5. Repeat this until your dish has layers. A loaf pan takes 2 to 3 layers, the 9 x 13 pan recipe takes 2 layers.
  6. Refrigerate overnight, covered.
  7. Cover with whipped cream before serving and sprinkle with a final dusting of cocoa powder.

Sugar Note: You can substitute caster sugar for confectioner’s sugar. Confectioner’s will give a better result, but it contains corn starch, which some people are allergic to.

Food Safety Note: If this is being served on a buffet or for a “bring a plate”, keep it cold and bring it out at dessert time. It contains raw egg yolks. Making the Giant one in a heavy glass or ceramic pan keeps it colder for longer on your table.

Mix it up with: Cinnamon, berries, cherries, chocolate shavings, more booze but not too much more.

In-process image courtesy of Francesca V – her very similar tiramisu recipe is here, in Italian. She wrote a book on tiramisu!

She came out well, didn't she?
Article
2 comments

Some Cupcakes, or, Drawing On Fondant

“Who Will Be The Cupcake Queen of Wellington?” I’ll give you a hint: at the A La Mode Photography Studio’s Revamp party, it wasn’t me. I was pipped to the post by winner Hester’s delectable marshmallow frosting. But my entry raised some eyebrows with an important question: is that actually edible?

Turns out that you can now get food coloring pens, edible markers, with which you can draw on fondant. So, for a cupcake competition hosted by a photography studio, I thought I’d do some pin-up-photo themed cupcakes, pushing a pink and black food coloring pen to the limit on white fondant rectangles.

The full set of pin-up cupcakes.

The white fondant “toppers” are perched on top of chocolate-and-rosewater cupcakes with rich swirls of chocolate-and-rosewater frosting. A little pink edible glitter is on them too, and they were served on a tray made of a frame filled with pink pinup photos from history.

You can draw on fondant as well as you can draw in real life. Just three caveats. First, there are no do-overs – what you ink is what you get. Second, the more dry/hard the fondant is, the better. And third, nobody will eat your little fondant pictures, even if you eat part of one in front of them to prove they are indeed edible.

She came out well, didn't she?

There is a fondant Uncanny Valley. A small fondant item, like a heart or rose, gets eaten, even if it’s fluorescent orange. Large fondant ornaments or wrappers are frankly removed and discarded. But a medium-sized fondant topper is a bit too much fondant to eat but manageable enough that people feel weird about throwing it away. Perhaps if I had used more food-like colors, such as brown ink on cream fondant, these cupcake toppers would have seemed tastier.

One of the young girls present took a fancy to this one.

When I left the cupcake contest, children were using the fondant pictures as trading cards.

Ain't she sweet? She's made of pure sugar!

Article
0 comment

Making It Happen: Jo Coffey, Chocolatier of L’Affaire au Chocolat

The chocolate of my dreams...Jo Coffey already made itDo you have imaginary businesses? I know I do. One of them would be a chocolate boutique. Making exquisite yet amusing bon-bons. With beautifully designed boxes for the confections, and using El Rey chocolate, and …then I wake up. Oh, I’ve made chocolates at home. The simple yet messy processes of dipping strawberries and rolling truffles taught me to respect actual chocolatiers. There are two or three excellent ones in Wellington, and I’m so pleased to be able to interview one of my favorites, Jo Coffey of L’Affaire au Chocolat.

I first encountered L’Affaire au Chocolat at the City Market; the fine truffles and varietal chocolate bars made an impression of me. Finally, I made it to the store, where I was charmed, not only by the cozy refinement of the little shop, but by the master chocolatier behind it, Jo Coffey herself. There is both warmth and stainless steel behind the chocolate to make this dream of a business succeed. My purchase of a few saffron truffles one day turned into a conversation – Coffey and I are both aficionados of South American chocolate varietals –  and this interview is the follow up.

The day I went to meet with Coffey in her store, there was a constant stream of customers, saying, “I hear you’ve got the best hot chocolate in town…” And it’s true: she does. Made with simply frothed milk and a ladleful of melted fine dark chocolate, served with a dark chocolate morsel on the side,  it’s hot chocolate perfection. The serried ranks of glossy chocolates in the case became depleted as the morning went on, too.  Coffey gave me a peek behind the scenes at her chocolate vats (vats! of chocolate!) and took the time to answer these questions.

Jo Coffey, chocolatier and business owner.

Behind the cut, Coffey remembers sweets for tuppence, describes the men who buy chocolate, and shares with us why French food is suddenly everywhere, again, and how to be a more intelligent chocolate consumer.

[Read more]

Article
0 comment

Have Some Cake

Very busy over here doing some freelance work, wrapping up a project for a cartooning /illustration class, and getting ready for a July burlesqueathon (more news soon). This would explain why I saved three draft posts as “Published” instead of  “Draft.” If you were wondering why my ruminations were so unpolished, that’s why.  So, as a filler post while I perish of mortification, have some cakes that I made. I also recommend reading The Hectic Eclectic by the delightful Mrs. C – she’s boosted her posting about crafts and cuisine lately and is working on a frock coat.

Cakes! I baked this one for a burlesque travel fundraiser. Was she inspired by Arthur de Pin’s Peches Mignons characters? Mais oui! (Link here, NSFW). I didn’t make it to the fundraiser myself, being hammered by the flu, but I am told she was delicious. Red velvet cake and vanilla buttercream inside.

Burlesque damsel cake. Red velvet inside!

The other cake was my birthday cake this year, for my steampunk-retro-burlesque-dinosaur birthday party. Orange cake and chocolate frosting underneath the chocolate fondant.

As you can see, I come from the Ed Emberly school of fondant use. Each of these needed a custom-made cardboard mat which is simply heavy cardboard from a clean, food-grade box, cut to size and wrapped in shiny baker’s paper. The baker’s paper allows you to wipe off frosting mistakes easily.

Saurian and pinup girl cake!